Mac
Open RDP-Gate-<version>-macOS.dmg and drag RDP Gate to Applications. The first time, right-click it and choose Open (the build isn't notarized yet). Install Microsoft's Windows App too.
 RDP Gate
Operation guide
This guide has three parts. First install the agent on the Windows PC you connect to (the server). Then set up the app on each Mac or PC you connect from (the client). Finally, sign in: from the app, the command line or a browser.
Setup takes about 15 minutes. Have these ready:
| Server | A Windows 10/11 Pro, Enterprise or Education PC, or Windows Server. Windows Home can't accept Remote Desktop connections. You need an administrator account and a Windows password (Remote Desktop doesn't work with passwordless sign-in). |
|---|---|
| Router | Admin access, in case UPnP is off and you have to forward ports by hand. You'll also reserve a fixed LAN address for the PC. |
| GitHub | A free GitHub account, ideally one used only for RDP Gate. The server publishes its encrypted address in a secret gist on this account. |
| Phone | Any authenticator app: Google or Microsoft Authenticator, 1Password, Bitwarden and so on. |
| Mac client | macOS 11 or later, and Microsoft's free Windows App for the Remote Desktop session itself. |
| Windows client | Nothing extra: RDP Gate uses the built-in Remote Desktop Connection. |
Download everything from the Releases page, and check files against SHA256SUMS.txt there.
Everything in this part happens on the PC you want to reach from outside.
Your PC has no fixed address, so it publishes its current IP in a secret gist, encrypted and signed. To do that it needs a token.
Why a separate account? A Gists token can read and change every gist on its account, and GitHub can't narrow it to one. On an account used only for this, a leaked token exposes nothing else.
Run RDP-Gate-Server-Setup-<version>.exe. At the SmartScreen prompt choose More info, then Run anyway (the build isn't Microsoft-signed yet). The wizard asks for:
| Browser sign-in with my domain | Leave it unticked unless you want browser sign-in. If you tick it, the next page explains what you need and asks for the domain; afterwards RDP Gate Server shows the exact DNS records and checks them. The desktop app never needs a domain. |
|---|---|
| Forward ports on my router | Keep ticked. Setup asks the router (UPnP) to forward TCP 47443 and 3389 to this PC. RDP Gate never uses ports 80 or 443, so a web server or VPN can keep them. |
| Account lockout policy | Keep ticked. 10 wrong Windows passwords lock that account for 15 minutes. |
| Stop this PC sleeping | Keep ticked on a desktop. A sleeping PC can't answer, and nothing on the internet can wake it. On a laptop this only warns. |
| Show the service's status | Keep ticked. An RDP Gate icon next to the clock shows whether the service is running; click it to open RDP Gate Server. |
| Also open UDP | Off by default. UDP makes Remote Desktop smoother, but UDP senders can be forged. Leave it off unless you need it. |
| When to close Remote Desktop | Now if you're sitting at the PC. After my first sign-in if you're installing over Remote Desktop: closing it now would disconnect you, with no enrolled computer to get back in. Setup picks this one for you when it sees a Remote Desktop session. |
Setup then turns on Remote Desktop with Network Level Authentication, creates the server identity and starts the RDPGate Windows service, without opening any console window. With Now it first blocks inbound traffic in Windows Firewall, and stops if Group Policy still exposes Remote Desktop (it tells you in a message; the details are in C:\ProgramData\RDPGate\logs\setup.log).
At the end RDP Gate Server opens with a Finish setting up list. Its first step is the beacon: choose Set up…, paste the token from step 1 and choose Save and publish. The next ones are the 6-digit codes (below) and your computers.
Installing over Remote Desktop? With After my first sign-in, Remote Desktop stays reachable as before. Once one of your computers has signed in through RDP Gate and connected to Remote Desktop, the service closes it to everyone else by itself. Your address keeps its own opening, so that session stays up. rdpgate-server status shows Protection: PENDING until then. To close it earlier, run rdpgate-server protect.
Unzip RDP-Gate-<version>-Windows-Server.zip, open PowerShell as Administrator in that folder and run:
Set-ExecutionPolicy -Scope Process Bypass
.\install-server.ps1
Switches: -Protect Now|AfterSignIn (default: AfterSignIn inside a Remote Desktop session, otherwise Now), -DomainSetup or -PublicHost rdp.example.com (with -CertFile and -KeyFile), -AllowUdp, -Lan On|Off, -SkipLockout, -SkipSleep, -NoBeacon, -NoTotp, -RdpPublicPort 53389, -ListenPort 8443.
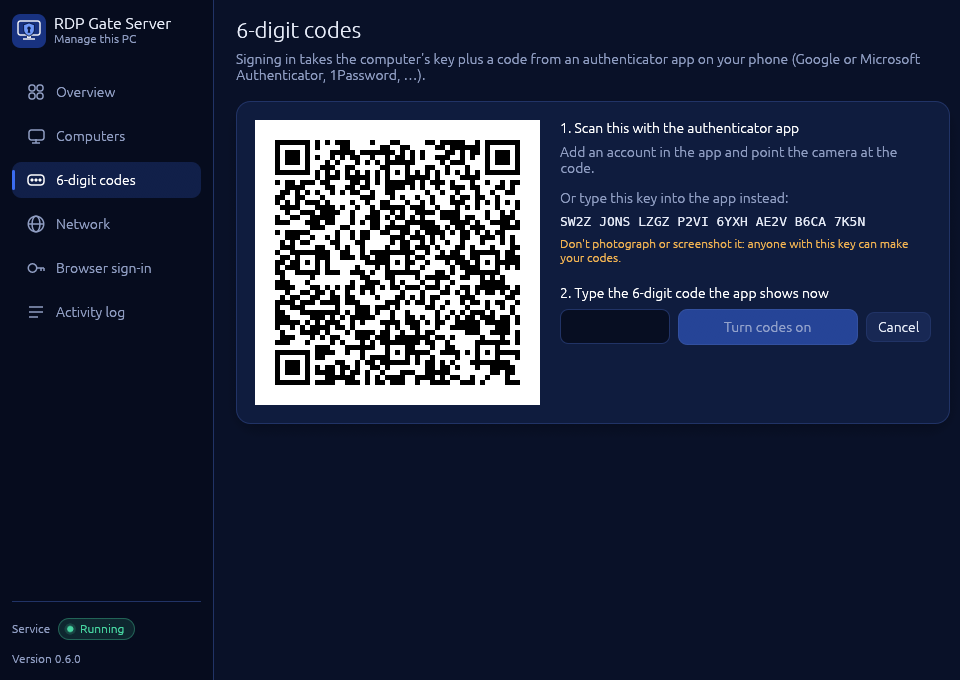
In RDP Gate Server's Finish setting up list, choose Set up… next to the 6-digit codes: a QR code appears. Scan it with your authenticator app and type the code it shows. (A reinstall keeps the codes you already have.) To do it later or again, open RDP Gate Server > 6-digit codes, or run in PowerShell as Administrator:
rdpgate-server totp-setup            # add --invert if the QR code won't scan
rdpgate-server totp-setup --force    # replace the secret (old codes stop working)
Or open RDP Gate Server > 6-digit codes from the Start menu:
Usually there's nothing to do. Check what happened:
rdpgate-server status    # identity, beacon, router forwards, warnings
rdpgate-server router    # try the router forwards again and report
If the router refused UPnP, forward these by hand in its admin page, to this PC's LAN address:
| External | To this PC | Purpose |
|---|---|---|
| TCP 47443 | 47443 | Sign-in |
| TCP 3389 | 3389 | Remote Desktop. Windows Firewall keeps it closed until someone signs in. |
Either way, give the PC a reserved (fixed) address in the router's DHCP settings, so the forwards keep pointing at it.
If status reports carrier-grade NAT, your ISP shares one public IP among many customers, and nothing from outside can reach your PC. Ask the ISP for a public IPv4 address. It's often free.
Do this once on every computer you want to connect from. Each gets its own key, so you can remove one without affecting the others.
Open RDP-Gate-<version>-macOS.dmg and drag RDP Gate to Applications. The first time, right-click it and choose Open (the build isn't notarized yet). Install Microsoft's Windows App too.
Run RDP-Gate-Client-Setup-<version>.exe. It installs just for you, with no administrator rights, and adds RDP Gate to the Start menu. At SmartScreen choose More info → Run anyway.
Open RDP Gate. On Set up this computer, fill in:
macbook.Choose Create device key.
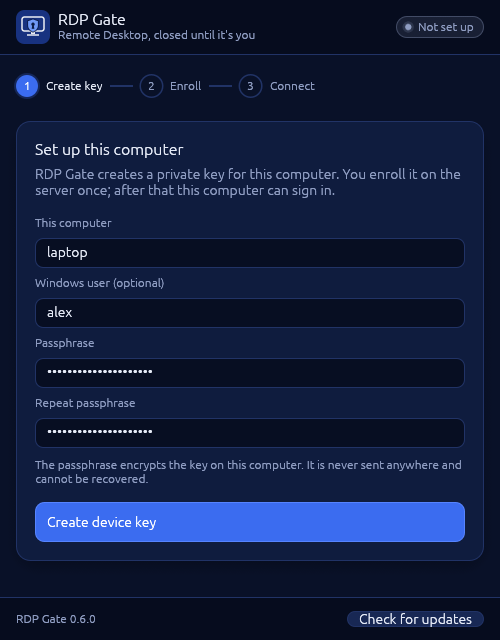
The app now shows Enroll this computer with one command. Choose Copy command. On the server, open RDP Gate Server > Computers and paste it into Add a computer, or paste and run it in PowerShell as Administrator:
rdpgate-server device-add macbook rdpgate-ed25519:3q2+7w…Paste the whole copied line: the key is the long word starting with rdpgate-ed25519:, and it comes from the computer you'll connect from, not from the server.
The server shows the device's fingerprint. Check that it matches the fingerprint shown in the app. If it doesn't, the command was changed on the way: don't continue.
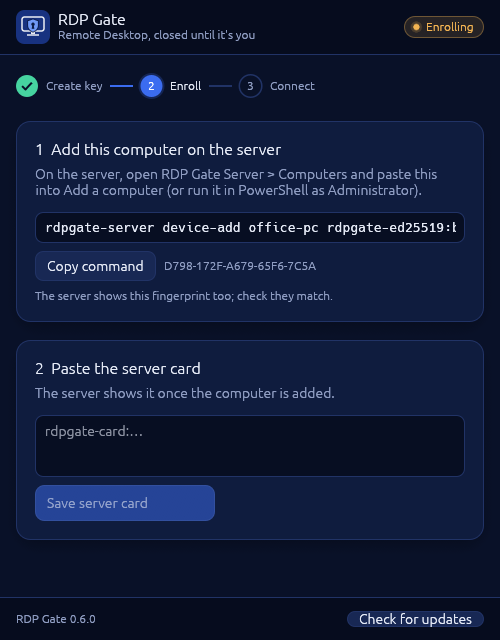
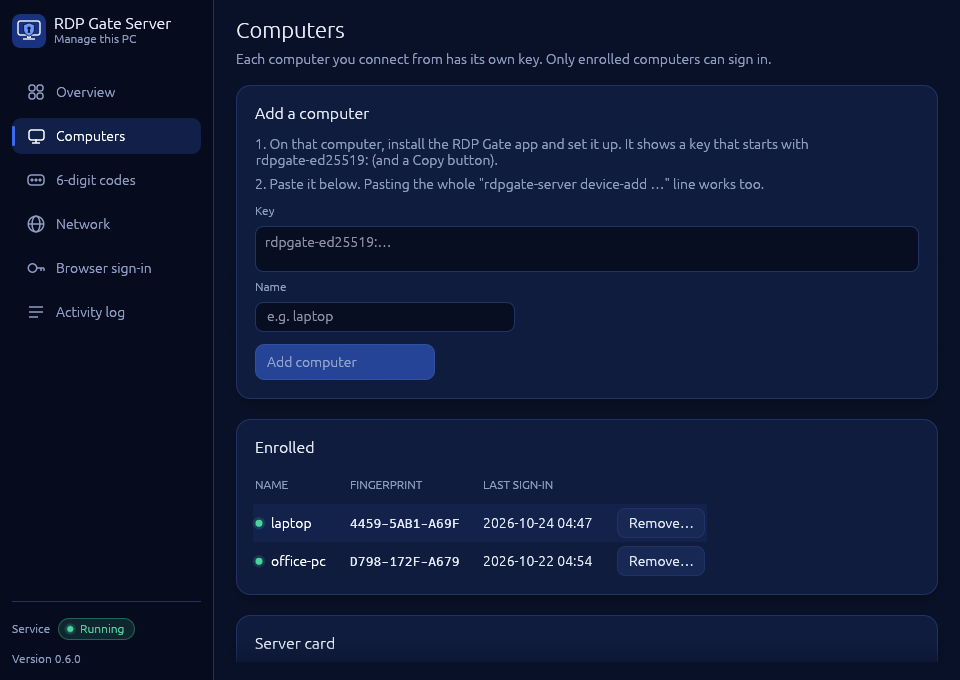
The server also prints a server card, a line starting with rdpgate-card:. Paste it into the app and choose Save server card.
The card tells the app how to find your PC, and pins the server's identity key so that a fake server is caught. Keep it private: it can't sign in by itself, but it reveals where your PC is. Print it again any time with rdpgate-server card.
The rdpgate tool does the same steps:
rdpgate init --name macbook --username you     # prints the device-add command
rdpgate card rdpgate-card:…                     # after running device-add on the server
rdpgate show # fingerprints, pinned server, enroll commandTest from outside your home network first, for example over your phone's hotspot. From inside, see "is not a public address".
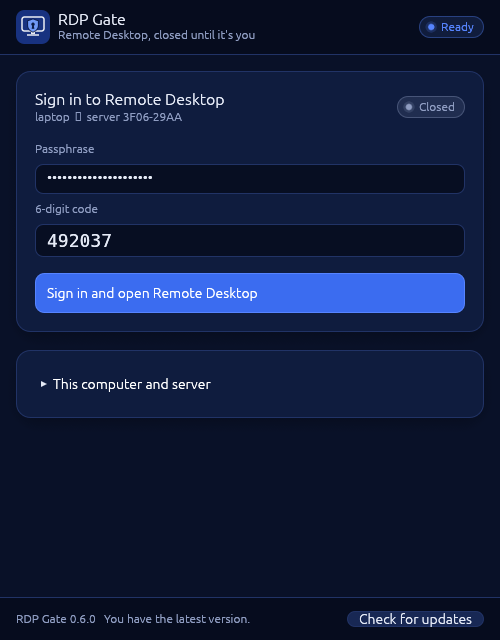
Enter your passphrase and the current 6-digit code, then choose Sign in and open Remote Desktop. In a few seconds the app:
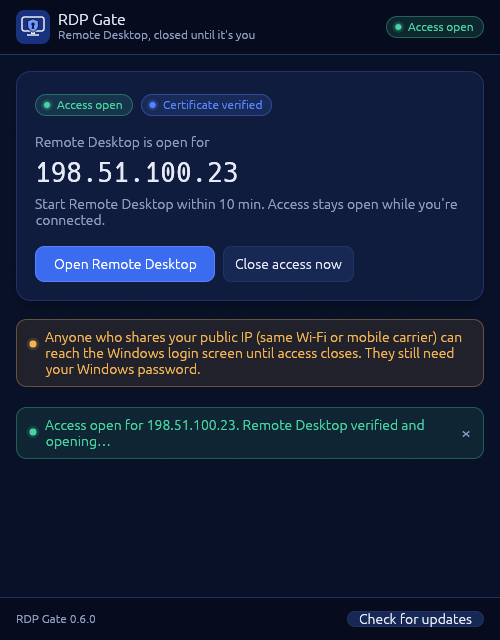
The app shows Open for <your IP> and a countdown. You have 10 minutes to start Remote Desktop. While you're connected, access stays open (up to 12 hours). Both times can be changed in RDP Gate Server → Overview → Time limits. If your computer has both IPv6 and IPv4, signing in opens both addresses, and locking closes both. If the Remote Desktop window closed, choose Open Remote Desktop to reopen it.
Open Remote Desktop settings below the sign-in card. Changes are saved straight away and apply every time RDP Gate opens Remote Desktop:
Remember my Windows password keeps your Windows user name and password in Windows Credential Manager or the macOS Keychain, never in a file. Forget saved password removes it.
Choose Close access now in the app, or run rdpgate lock. Otherwise access closes by itself a few minutes after you disconnect.
While access is open, anyone behind the same public IP (hotel Wi-Fi, an office, a mobile carrier) can reach the Windows login screen. They still need your Windows password, but close access when you leave.
rdpgate connect                 # asks for passphrase and code, then opens Remote Desktop
rdpgate connect --no-launch     # only open the firewall; prints the address and .rdp file
rdpgate connect --address 203.0.113.7:47443 # try this address first
rdpgate connect --keep-signed-in --follow # stay signed in; move access when the IP changes
rdpgate forget                  # sign this computer out: passphrase and code next time
rdpgate settings                # show the Remote Desktop settings
rdpgate settings --display all-monitors --drives on   # change them (--help lists all)
rdpgate password                # remember your Windows password (--forget, --copy on a Mac)
rdpgate lock # close access for this network nowUse this from a computer without the app, such as a work laptop or a friend's PC. Sign in with Touch ID, Face ID, Windows Hello or a security key.
Browsers tie passkeys to a domain name, never an IP address, so you need:
example.com, from any registrar or Cloudflare.rdp.example.com, pointing at your home's public IP.https://rdp.example.com:47443/….The desktop app doesn't need any of this.
Tick browser sign-in in Setup, or later open RDP Gate Server > Browser sign-in > Set up with my domain. From PowerShell as Administrator it's:
rdpgate-server domain-setupIt walks you through four steps:
rdp.example.com.A for IPv4 and, if you have IPv6, AAAA (name, value, TTL). Then it checks them until they're right. It warns about a Cloudflare proxy (set it to DNS only) and any record that points somewhere else.Your devices, passkeys, beacon and other settings are kept. To turn browser sign-in off again: rdpgate-server domain-setup --remove.
rdpgate-server status
# Browser login:  https://rdp.example.com/Xk3…random…/
The page lives at a random path, so scanners never find it. Bookmark the full URL on each device you'll use. The domain alone shows nothing.
rdpgate-server passkey-enroll # prints a one-time link, valid 15 minutesOpen the link on the device whose passkey you want to add (your iPhone, Mac or PC), give it a name and choose Create passkey. Treat the link like a password. Repeat for each device. passkey-list and passkey-remove NAME manage them.
Open your bookmarked sign-in page and choose Sign in with passkey. The page then shows:
Choose Close access now on the same page when you're done.
Run these on the server in PowerShell as Administrator.
| See what's going on | rdpgate-server status: identity, beacon, router, warnings and every open firewall grant. |
|---|---|
| Add another computer | Repeat Part 2 on it. Each computer gets its own device-add and key, and they all use the same 6-digit codes. Two computers can't use the same code: if one just signed in, wait for the next code. |
| Protection still pending | rdpgate-server protect closes Remote Desktop to everyone who hasn't signed in, now. It asks first if you're connected over Remote Desktop. |
| Add or change a domain | RDP Gate Server > Browser sign-in, or rdpgate-server domain-setup (see browser sign-in). |
| List or remove computers | rdpgate-server device-list, rdpgate-server device-remove macbook. Removing takes effect immediately. |
| Lost or stolen laptop | device-remove it. Its key is useless without your passphrase and code anyway, but remove it. |
| Sign in less, IP keeps changing | Tick Keep me signed in on this computer when you sign in (rdpgate connect --keep-signed-in). After that one sign-in with passphrase and code the computer is remembered until its hardware changes: the app opens access for its current IP address as soon as it starts, shows one Connect button, and moves access to a new IP address within seconds of the network changing. Anyone using that computer's account can connect, so only do this for computers you keep locked. Sign out (forget this computer) in the app, or Forget on the server (rdpgate-server device-forget macbook), undoes it. The server allows it by default: RDP Gate Server > Computers > Let computers stay signed in, or rdpgate-server keep-signed-in off. Auto mode (rdpgate-server device-auto macbook on) lets one computer stay signed in even while that is off. |
| Too many wrong codes | After 10 wrong codes that computer is locked: rdpgate-server device-unlock macbook. |
| New phone | rdpgate-server totp-setup --force and scan the new QR code. |
| Replace the GitHub token | rdpgate-server beacon-setup. |
| Updates | Automatic and signed. The server installs them and restarts on the new version; signed-in computers keep their access and Remote Desktop stays connected. On the server, use RDP Gate Server → Overview → Check for updates (or rdpgate-server update); in the app, click Check for updates at the bottom of the window. |
| Logs | C:\ProgramData\RDPGate\logs\rdpgate.log: every refusal (DENY), sign-in (GRANT open), RDP connection and closure. |
| Settings | C:\ProgramData\RDPGate\config.json, then rdpgate-server service-restart (signed-in computers stay connected). See the settings table. |
| Uninstall | Settings → Apps → RDP Gate Server. Answer Yes to put back everything Setup changed (firewall, Remote Desktop rules and settings, lockout policy, sleep, router forwards) as it was before installing. Answer No to keep Remote Desktop blocked from the network. Your RDP Gate data is kept either way. |
| "answered but is NOT your server" | Something other than your server answered. If you reinstalled the server (new identity), paste its new card. Otherwise treat it as a spoofing attempt. |
|---|---|
| "key must start with rdpgate-ed25519:" or "That isn't a computer's key" | device-add needs the key of the computer you connect from. In the RDP Gate app on that computer, choose Copy command (or This computer and server > Copy enrollment command) and paste the whole line, or just the long word starting with rdpgate-ed25519:. rdpgate show prints it too. |
| RDP Gate Server says "config.json: Access is denied" | The window couldn't read C:\ProgramData\RDPGate, which only Administrators and SYSTEM may open. Open RDP Gate Server from the Start menu and choose Yes when Windows asks for administrator permission. If it still says this, run RDP Gate Server Setup again. It re-applies the folder's permissions and keeps your settings. |
| "The server refused this computer" | The computer isn't enrolled (check device-list), or your IP is blocked for a while after repeated failures. |
| "this computer is locked after too many wrong codes" | Run rdpgate-server device-unlock NAME on the server. Check your phone's clock is set automatically. |
| "is not a public address" | You signed in from your own network. Test from outside, or allow it: rdpgate-server lan on (or tick Also allow sign-in from computers on my home network in Setup). |
| Can't reach the server from outside | Run rdpgate-server router. It retries the forwards and tells you if UPnP is off or your ISP uses carrier-grade NAT. Check the PC isn't asleep. |
| "Port 47443 is already used by …" | Another program holds the port. Stop it, or install with -ListenPort 8443 and forward the router's 47443 to 8443. |
Beacon errors in status | The GitHub token expired or lost Gists access. Run rdpgate-server beacon-setup. |
| Windows rejects your password in Remote Desktop | Microsoft accounts with "passwordless" sign-in have no usable password. Turn off Require Windows Hello sign-in for Microsoft accounts, or use a local account. |
Still stuck? Open an issue on GitHub with the relevant lines from the log. Report security problems privately: see SECURITY.md.